
In this article I would like to describe my experience of installing OPNsense firewall on old Check Point hardware (Check Point 3200 PB-10).
I bought a Check Point 3200 PB-10 on eBay for about 100€, hoping it would have some permanent licences and I would use it as a real Check Point firewall for my home lab. Unfortunately in my case I was not lucky and my Check Point appliance had no licence on it.
On the one hand I just wasted 100€, on the other hand why not use this hardware for OPNsense?
Comparing OPNsense hardware with hardware like Check Point 3200 with 6 LAN ports, even if it is not certified hardware from OPNsense itself, will cost you more than 300€. Certified hardware from the official OPNsense shop will cost you even more: the smallest box will cost you around €700.
So let’s get started and install OPNsense on the Check Point 3200 PB-10 appliance.
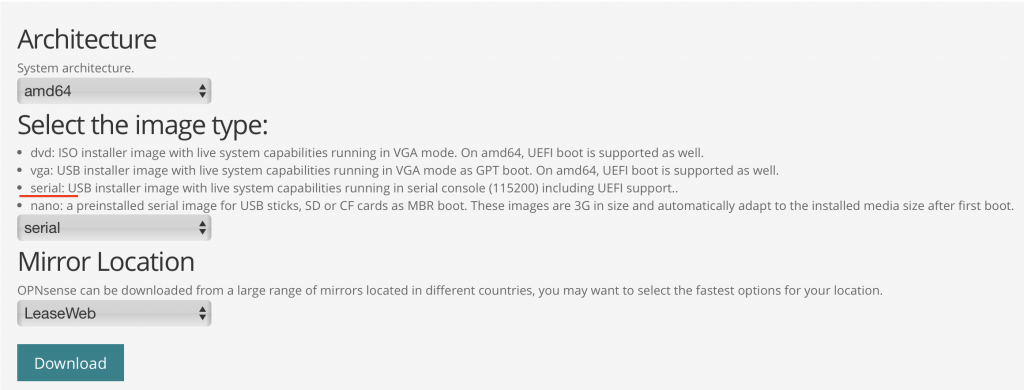
- First, download the OPNsense image from the official website. As the Check Point 3200 appliance doesn’t have a display port, all installations are done through the serial port. The type of image you need to download in this case is serial.
2. Now let’s create a bootable USB disk drive from this image. Example on macOS, disk4 may be different for you:
sudo bzip2 -dc Downloads/OPNsense-24.7-serial-amd64.img.bz2 | sudo dd of=/dev/disk4 bs=1m3. Insert the USB drive to one of the USB drives on the Check Point appliance and connect to the Check Point via the serial port. Use bitrate 15200 as recommended by OPNsense for serial installation:
screen /dev/tty.usbserial-1110 1152004. Powercycle the Check Point. The OPNsense installation process will now start.
At this point, my installation process was not successful and always aborted with an error like (not an exact error, sorry, I forgot to save the error message):
Root mount waiting for: CAM
Cannot mount root from USB drive blablabla
The solution for me was to plug my USB drive into a different USB port on the Check Point. As you can see in the picture above, we have two USB ports. I am not sure if there is a faulty USB drive on my machine or if it was just a bug.
Anyway, the installation process was successful and I was able to start configuring OPNsense.
5. Configuring OPNsense
Since Check Point is not certified hardware for OPNsense, the port assignment by the FreeBSD kernel (which is actually a platform on which OPNsense runs) was not really smooth. My guess is that FreeBSD assigns port numbers based on the MAC addresses of the interfaces.
The Check Point 3200 has 6 copper ports, named Check Point 1-5 and Mgmt (see picture above).
The OPNsense port naming in my case was igb0-igb5.
When configuring OPNsense, you really need to know how the mapping was done, and which Check Point port (1-5 and mgmt) was mapped to which igbX port in OPNsense, in order to correctly map your WAN and LAN interfaces in the OPNsense configuration.
After some reverse engineering I found the following mapping in my case:
| MAC address | Port on Check Point | Port in FreeBSD (OPNsense) |
| 00:1c:7f:86:11:30 | 5 | igb0 |
| 00:1c:7f:86:11:2f | 4 | igb5 |
| 00:1c:7f:86:11:2e | 3 | igb4 |
| 00:1c:7f:86:11:2d | 2 | igb3 |
| 00:1c:7f:86:11:2c | 1 | igb2 |
| 00:1c:7f:86:11:31 | Mgmt | igb1 |
As I mentioned earlier, it looks like OPNsense (FreeBSD kernel) uses the MAC address to assign the port number. So the port numbering can be a bit confusing.
But once you have clarified the correct port assignment, you can actually start the full configuration of OPNsense and use it.
Surely there should be a way to change the port mapping in the FreeBSD kernel so that you have a 1 to 1 mapping like igb1 <-> port1, but I haven’t done any research in that direction.
Conclusion
Apart from two minor hiccups, one with a broken USB port on the Check Point hardware and the other with port mapping, the installation of OPNsense on the Check Point firewall went pretty smoothly. I’ve been using OPNsense in my home lab for a few days now and haven’t noticed any problems or bugs.
Some proof 🙂
  0) Logout                              7) Ping host
  1) Assign interfaces                   8) Shell
  2) Set interface IP address            9) pfTop
  3) Reset the root password            10) Firewall log
  4) Reset to factory defaults          11) Reload all services
  5) Power off system                   12) Update from console
  6) Reboot system                      13) Restore a backup

Enter an option: 8

~ # dmidecode
# dmidecode 3.6
Scanning /dev/mem for entry point.
SMBIOS 2.8 present.
53 structures occupying 1987 bytes.
Table at 0x7F4F8000.

Handle 0x0001, DMI type 1, 27 bytes
System Information
	Manufacturer: CheckPoint
	Product Name: PB-10-00
	Version: PB-10-1.4
	Serial Number: 1737BA1205
	UUID: 03000200-0400-0500-0006-000700080009
	Wake-up Type: Power Switch
	SKU Number: PB-10
	Family: PB