
Quote from Wikipedia:
OpenVAS (Open Vulnerability Assessment System, originally known as GNessUs) is the scanner component of Greenbone Vulnerability Manager (GVM), a software framework of several services and tools offering vulnerability scanning and vulnerability management.
All Greenbone Vulnerability Manager products are free software, and most components are licensed under the GNU General Public License (GPL). Plugins for Greenbone Vulnerability Manager are written in the Nessus Attack Scripting Language, NASL.
Wikipedia
In few words: OpenVAS is open source and free of charge network vulnerability scanner. Let’s install it on Kali Linux.
Installation on Kali
Let’s update our repositories and upgrade the packages:
sudo apt update && sudo apt upgrade

sudo apt dist-upgrade
Now let’s install OpenVAS:
sudo apt install openvasIt was pretty quick step. The next one will take much more time. In the next step OpenVAS will download and update NVTs (Network Vulnerability Test), CVEs (Common Vulnerabilities and Exposures). CPEs (Common Platform Enumeration) and stuff like that. For me it was more than 80k NVTs to be updated, the whole step took about 20 min time:
sudo gvm-setupAt the end of this step OpenVAS will generate admin user with password to allow you to log in to the UI. Please note this password:
[+] Done
[*] Please note the password for the admin user
[*] User created with password '10e05847-eb09-4608-a504-a731efea14ac'.

[>] You can now run gvm-check-setup to make sure everything is correctly configured
Now you can run following command to see, if setup was correct and everything has been configured without problems:
sudo gvm-check-setupIm my case everything looks fine:
└─$ sudo gvm-check-setup
gvm-check-setup 22.4.1
  Test completeness and readiness of GVM-22.4.1
Step 1: Checking OpenVAS (Scanner)...
        OK: OpenVAS Scanner is present in version 22.4.1.
        OK: Notus Scanner is present in version 22.4.4.
        OK: Server CA Certificate is present as /var/lib/gvm/CA/servercert.pem.
Checking permissions of /var/lib/openvas/gnupg/*
        OK: _gvm owns all files in /var/lib/openvas/gnupg
        OK: redis-server is present.
        OK: scanner (db_address setting) is configured properly using the redis-server socket: /var/run/redis-openvas/redis-server.sock
        OK: redis-server is running and listening on socket: /var/run/redis-openvas/redis-server.sock.
        OK: redis-server configuration is OK and redis-server is running.
        OK: the mqtt_server_uri is defined in /etc/openvas/openvas.conf
        OK: _gvm owns all files in /var/lib/openvas/plugins
        OK: NVT collection in /var/lib/openvas/plugins contains 84371 NVTs.
        OK: The notus directory /var/lib/notus/products contains 387 NVTs.
Checking that the obsolete redis database has been removed
        OK: No old Redis DB
        OK: ospd-OpenVAS is present in version 22.4.6.
Step 2: Checking GVMD Manager ...
        OK: GVM Manager (gvmd) is present in version 22.4.2.
Step 3: Checking Certificates ...
        OK: GVM client certificate is valid and present as /var/lib/gvm/CA/clientcert.pem.
        OK: Your GVM certificate infrastructure passed validation.
Step 4: Checking data ...
        OK: SCAP data found in /var/lib/gvm/scap-data.
        OK: CERT data found in /var/lib/gvm/cert-data.
Step 5: Checking Postgresql DB and user ...
        OK: Postgresql version and default port are OK.
 gvmd      | _gvm     | UTF8     | en_US.UTF-8 | en_US.UTF-8 |            | libc            |
16435|pg-gvm|10|2200|f|22.4.0||
        OK: At least one user exists.
Step 6: Checking Greenbone Security Assistant (GSA) ...
        OK: Greenbone Security Assistant is present in version 22.04.1~git.
Step 7: Checking if GVM services are up and running ...
        Starting ospd-openvas service
        Waiting for ospd-openvas service
        OK: ospd-openvas service is active.
        Starting gvmd service
        Waiting for gvmd service
        OK: gvmd service is active.
        Starting gsad service
        Waiting for gsad service
        OK: gsad service is active.
Step 8: Checking few other requirements...
        OK: nmap is present.
        OK: ssh-keygen found, LSC credential generation for GNU/Linux targets is likely to work.
        WARNING: Could not find makensis binary, LSC credential package generation for Microsoft Windows targets will not work.
        SUGGEST: Install nsis.
        OK: xsltproc found.
        WARNING: Your password policy is empty.
        SUGGEST: Edit the /etc/gvm/pwpolicy.conf file to set a password policy.
Step 9: Checking greenbone-security-assistant...
        OK: greenbone-security-assistant is installed

It seems like your GVM-22.4.1 installation is OK.
Now let’s start OpenVAS service:
$ sudo gvm-start
[>] Please wait for the GVM services to start.
[>]
[>] You might need to refresh your browser once it opens.
[>]
[>]  Web UI (Greenbone Security Assistant): https://127.0.0.1:9392
That actually all, OpenVAS is installed and running.
GUI is now reachable under:
https://127.0.0.1:9392Configure OpenVAS to be accessible from your internal network
The problem, that you will get after you have successfully installed OpenVAS, is that GUI will be accessible only via localhost IP address of the particular server, where OpenVAS is installed. It means you can only use localhost as a hostname in the Webbrowser or 127.0.0.1 as IP address to reach UI of OpenVAS.
My server has IP address 192.168.188.146. While trying to open OpenVAS GUI from another client in my network using this IP nothing happens:
┌──(XXX㉿de-hh-kali-1)-[/etc/default]
└─$ ip a
1: lo: <LOOPBACK,UP,LOWER_UP> mtu 65536 qdisc noqueue state UNKNOWN group default qlen 1000
    link/loopback 00:00:00:00:00:00 brd 00:00:00:00:00:00
    inet 127.0.0.1/8 scope host lo
       valid_lft forever preferred_lft forever
    inet6 ::1/128 scope host
       valid_lft forever preferred_lft forever
2: eth0: <BROADCAST,MULTICAST,UP,LOWER_UP> mtu 1500 qdisc fq_codel state UP group default qlen 1000
    link/ether 7a:7b:5c:4e:a4:9c brd ff:ff:ff:ff:ff:ff
    inet 192.168.188.146/24 brd 192.168.188.255 scope global dynamic noprefixroute eth0
       valid_lft 858563sec preferred_lft 858563sec
    inet6 2001:9e8:e36d:6c00:95c8:8fd2:c496:99d8/64 scope global temporary dynamic
       valid_lft 6774sec preferred_lft 3174sec
    inet6 2001:9e8:e36d:6c00:787b:5cff:fe4e:a49c/64 scope global dynamic mngtmpaddr noprefixroute
       valid_lft 6774sec preferred_lft 3174sec
    inet6 fe80::787b:5cff:fe4e:a49c/64 scope link noprefixroute
       valid_lft forever preferred_lft forever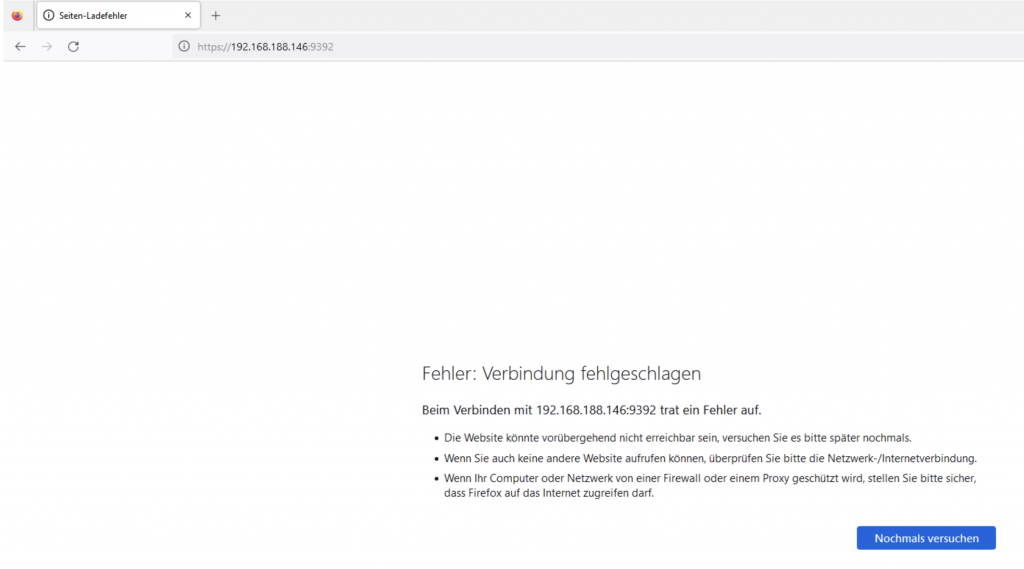
Why we can open GUI only from localhost, well, because our server listening on port 9392 only on his localhost IP address:
┌──(XXX㉿de-hh-kali-1)-[/etc/default]
└─$ netstat -tulpn
(Not all processes could be identified, non-owned process info
 will not be shown, you would have to be root to see it all.)
Active Internet connections (only servers)
Proto Recv-Q Send-Q Local Address           Foreign Address         State       PID/Program name
tcp        0      0 127.0.0.1:80            0.0.0.0:*               LISTEN      -
tcp        0      0 0.0.0.0:22              0.0.0.0:*               LISTEN      -
tcp        0      0 127.0.0.1:5432          0.0.0.0:*               LISTEN      -
tcp        0      0 127.0.0.1:9392          0.0.0.0:*               LISTEN      -
tcp        0      0 127.0.0.1:1883          0.0.0.0:*               LISTEN      -
tcp        0      0 127.0.0.1:6010          0.0.0.0:*               LISTEN      -
tcp6       0      0 ::1:5432                :::*                    LISTEN      -
tcp6       0      0 ::1:1883                :::*                    LISTEN      -
tcp6       0      0 ::1:6010                :::*                    LISTEN      -
tcp6       0      0 :::22                   :::*                    LISTEN      -
udp6       0      0 fe80::787b:5cff:fe4:546 :::*                                -
But you want surely access OpenVAS GUI from anywhere, at least from your internal network, via server IP address. Let’s configure it!
You need to stop OpenVAS service first and edit following configuration file:
─$ sudo gvm-stop

$ sudo vim /lib/systemd/system/greenbone-security-assistant.service
In this configuration file you have to find 127.0.0.1 IP address and replace it with 0.0.0.0.

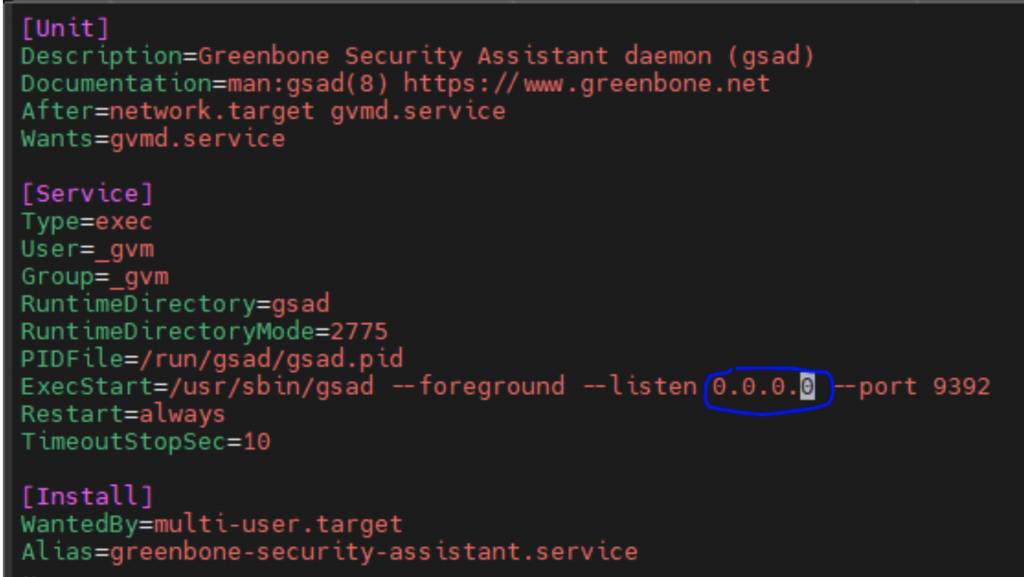
While replacing 127.0.0.1 with 0.0.0.0 you will configure server to listen on port 9392 independently of IP addresses, easy to say, whatever IP is assigned to this server, it will always answer on requests to port 9393 through this IP. So now save the configuration file and do following to accept the changes:
$ sudo systemctl daemon-reloadLet’s check…. Looks good, server is listening on port 9392 independently of local IP he has:
└─$ netstat -tulpn
(Not all processes could be identified, non-owned process info
 will not be shown, you would have to be root to see it all.)
Active Internet connections (only servers)
Proto Recv-Q Send-Q Local Address           Foreign Address         State       PID/Program name
tcp        0      0 0.0.0.0:9392            0.0.0.0:*               LISTEN      -
tcp        0      0 0.0.0.0:80              0.0.0.0:*               LISTEN      -
tcp        0      0 0.0.0.0:22              0.0.0.0:*               LISTEN      -
tcp        0      0 127.0.0.1:5432          0.0.0.0:*               LISTEN      -
tcp        0      0 127.0.0.1:1883          0.0.0.0:*               LISTEN      -
tcp        0      0 127.0.0.1:6010          0.0.0.0:*               LISTEN      -
tcp6       0      0 ::1:5432                :::*                    LISTEN      -
tcp6       0      0 ::1:1883                :::*                    LISTEN      -
tcp6       0      0 ::1:6010                :::*                    LISTEN      -
tcp6       0      0 :::22                   :::*                    LISTEN      -
udp6       0      0 fe80::787b:5cff:fe4:546 :::*                                -
Now just start OpenVAS service again.
$ sudo gvm-startAnd let’s check, if we can open OpenVAS GUI from another machine as localhost. And yes, we can:
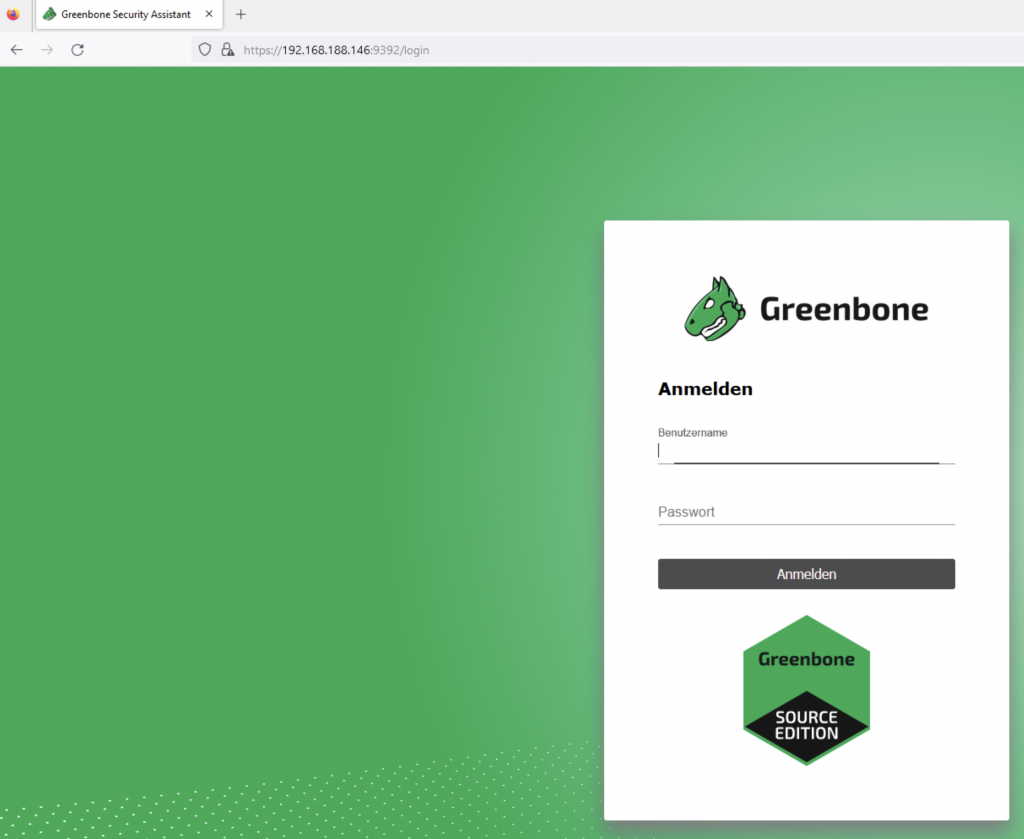
Just login with admin user and password you have noticed from previous step and go ahead with OpenVAS:) Have fun!